Featured 特色


Why CPU Knowledge Is No Longer Enough
为什么CPU知识不再足够
In today’s AI age, the majority of developers train in the CPU way. This knowledge has been part of our academics as well, so it’s obvious to think and problem-solve in a CPU-oriented way.
在当今的AI时代,大多数开发人员都是以CPU的方式进行培训的。这些知识也是我们学术的一部分,所以很明显,以面向CPU的方式思考和解决问题。
However, the problem with CPUs is that they rely on a sequential architecture. In today’s world, where we are dependent on numerous parallel tasks, CPUs are unable to work well in these scenarios.
然而,CPU的问题在于它们依赖于顺序架构。在当今世界,我们依赖于许多并行任务,CPU无法在这些场景中正常工作。
Some problems faced by developers include:
开发人员面临的一些问题包括:
Executing Parallel Tasks
执行并行任务
CPUs traditionally operate linearly, executing one instruction at a time. This limitation stems from the fact that CPUs typically feature a few powerful cores optimized for single-threaded performance.
CPU传统上是线性运行的,每次执行一条指令。这种限制源于CPU通常具有几个针对单线程性能进行优化的强大内核。
When faced with multiple tasks, a CPU allocates its resources to address each task one after the other, leading to a sequential execution of instructions. This approach becomes inefficient in scenarios where numerous tasks need simultaneous attention.
当面对多个任务时,CPU分配其资源以一个接一个地处理每个任务,从而导致指令的顺序执行。这种方法在需要同时关注多个任务的情况下变得低效。
While we make efforts to enhance CPU performance through techniques like multi-threading, the fundamental design philosophy of CPUs prioritizes sequential execution.
虽然我们努力通过多线程等技术来增强CPU性能,但CPU的基本设计理念优先考虑顺序执行。
Running AI Models Efficiently
高效运行AI模型
AI models, employing advanced architectures like transformers, leverage parallel processing to enhance performance. Unlike older recurrent neural networks (RNNs) that operate sequentially, modern transformers such as GPT can concurrently process multiple words, increasing efficiency and capability in training. Because when we train in parallel, it will result in bigger models, and bigger models will yield better outputs.
人工智能模型采用变压器等先进架构,利用并行处理来提高性能。与按顺序操作的旧递归神经网络(RNN)不同,GPT等现代转换器可以同时处理多个单词,从而提高训练效率和能力。因为当我们并行训练时,它会导致更大的模型,而更大的模型会产生更好的输出。
The concept of parallelism extends beyond natural language processing to other domains like image recognition. For instance, AlexNet, an architecture in image recognition, demonstrates the power of parallel processing by processing different parts of an image simultaneously, allowing for accurate pattern identification.
并行性的概念从自然语言处理扩展到其他领域,如图像识别。例如,AlexNet是一种图像识别架构,它通过同时处理图像的不同部分来展示并行处理的能力,从而实现准确的模式识别。
However, CPUs, designed with a focus on single-threaded performance, struggle to fully exploit parallel processing potential. They face difficulties efficiently distributing and executing the numerous parallel computations required for intricate AI models.
然而,CPU设计的重点是单线程性能,努力充分利用并行处理的潜力。他们面临着有效分配和执行复杂AI模型所需的大量并行计算的困难。
As a result, the development of GPUs has become prevalent to address the specific needs of parallel processing in AI applications, unlocking higher efficiency and faster computation.
因此,GPU的开发已经变得普遍,以解决AI应用中并行处理的特定需求,从而实现更高的效率和更快的计算。
How GPU Driven Development Solves These Issues
GPU驱动开发如何解决这些问题
Massive Parallelism With GPU Cores
GPU核心的大规模并行化
Engineers design GPUs with smaller, highly specialized cores compared to the larger, more powerful cores found in CPUs. This architecture allows GPUs to execute a multitude of parallel tasks simultaneously.
工程师们设计的GPU具有更小、高度专业化的内核,而CPU中的内核则更大、更强大。这种架构允许GPU同时执行多个并行任务。
The high number of cores in a GPU are well-suited for workloads depending on parallelism, such as graphics rendering and complex mathematical computations.
GPU中的大量内核非常适合依赖于并行性的工作负载,例如图形渲染和复杂的数学计算。
We will soon demonstrate how using GPU parallelism can reduce the time taken for complex tasks.
我们将很快演示如何使用GPU并行性来减少复杂任务所需的时间。
Parallelism Used In AI Models
人工智能模型中的相似性
AI models, particularly those built on deep learning frameworks like TensorFlow, exhibit a high degree of parallelism. Neural network training involves numerous matrix operations, and GPUs, with their expansive core count, excel in parallelizing these operations. TensorFlow, along with other popular deep learning frameworks, optimizes to leverage GPU power for accelerating model training and inference.
人工智能模型,特别是那些建立在TensorFlow等深度学习框架上的模型,表现出高度的并行性。神经网络训练涉及大量矩阵运算,而GPU凭借其庞大的核心数量,擅长并行处理这些运算。TensorFlow与其他流行的深度学习框架沿着进行了优化,以利用GPU的能力来加速模型训练和推理。
We will show a demo soon how to train a neural network using the power of the GPU.
我们将很快展示如何使用GPU的强大功能训练神经网络的演示。
CPUs Vs GPUs: What’s the Difference?
CPU VS GPU:有什么区别?
CPU
Sequential Architecture 顺序架构
Central Processing Units (CPUs) are designed with a focus on sequential processing. They excel at executing a single set of instructions linearly.
中央处理器(CPU)的设计重点是顺序处理。他们擅长线性地执行一组指令。
CPUs are optimized for tasks that require high single-threaded performance, such as
CPU针对需要高单线程性能的任务进行了优化,例如
- General-purpose computing
通用计算 - System operations 系统操作
- Handling complex algorithms that involve conditional branching
处理涉及条件分支的复杂算法
Limited Cores For Parallel Tasks
并行任务的有限内核
CPUs feature a smaller number of cores, often in the range of 2-16 cores in consumer-grade processors. Each core is capable of handling its own set of instructions independently.
CPU的核心数量较少,在消费级处理器中通常为2-16个核心。每个核心都能够独立处理自己的指令集。
GPU
Parallelized Architecture
企业化建筑
Graphics Processing Units (GPUs) are designed with a parallel architecture, making them highly efficient for parallel processing tasks.
图形处理单元(GPU)采用并行架构设计,可高效执行并行处理任务。
This is beneficial for
这有利于
- Rendering graphics 渲染图形
- Performing complex mathematical calculations
进行复杂的数学计算 - Running parallelizable algorithms
运行可并行化算法
GPUs handle multiple tasks simultaneously by breaking them into smaller, parallel sub-tasks.
Thousands Of Cores For Parallel Tasks
Unlike CPUs, GPUs boast a significantly larger number of cores, often numbering in the thousands. These cores are organized into streaming multiprocessors (SMs) or similar structures.
The abundance of cores allows GPUs to process a massive amount of data concurrently, making them well-suited for parallelisable tasks, such as image and video processing, deep learning, and scientific simulations.
AWS GPU Instances: A Beginner’s Guide
Amazon Web Services (AWS) offers a variety of GPU instances used for things like machine learning.
Here are the different types of AWS GPU instances and their use cases:
General-Purpose Gpu Instances
-
P3 and P4 instances serve as versatile general-purpose GPU instances, well-suited for a broad spectrum of workloads.
-
These include machine learning training and inference, image processing, and video encoding. Their balanced capabilities make them a solid choice for diverse computational tasks.
-
Pricing: The p3.2xlarge instance costs $3.06 per hour.
-
This provides 1 NVIDIA Tesla V100 GPU of 16 GB GPU memory
Inference-optimized GPU instances
-
Inference is the process of running live data through a trained AI model to make a prediction or solve a task.
-
P5 and Inf1 instances specifically cater to machine learning inference, excelling in scenarios where low latency and cost efficiency are essential.
-
Pricing: the p5.48xlarge instance costs $98.32 per hour.
-
This provides 8 NVIDIA H100 GPUs of 80 GB memory each, totalling upto 640 GB Video Memory.
Graphics-optimized GPU instances
-
G4 instances instances are engineered to handle graphics-intensive tasks.
-
A video game developer might use a G4 instance to render 3D graphics for a video game.
-
Pricing: g4dn.xlarge costs $0.526 to run per hour.
-
Uses 1 NVIDIA T4 GPU of 16 GB Memory.
Managed GPU Instances
-
Amazon SageMaker is a managed service for machine learning. It provides access to a variety of GPU-powered instances, including P3, P4, and P5 instances.
-
SageMaker is a good choice for organizations that wants to begin machine learning easily without having to manage the underlying infrastructure.
Using Nvidia’s CUDA for GPU-Driven Development
What Is Cuda?
CUDA is a parallel computing platform and programming model developed by NVIDIA, enabling developers to accelerate their applications by harnessing the power of GPU accelerators.
The Practical examples in the demo will use CUDA.
How to Setup Cuda on Your Machine
To setup CUDA on your machine you can follow these steps.
-
Download CUDA
-
From the above link download the base installer as well as the driver installer
从上面的链接下载基本安装程序以及驱动程序安装程序 -
Go to .bashrc in home folder
转到主文件夹中的.bashrc -
Add the following lines below
在下面添加以下行 -
export PATH="/usr/local/cuda-12.3/bin:$PATH" -
export LD_LIBRARY_PATH="/usr/local/cuda-12.3/lib64:$LD_LIBRARY_PATH" -
Execute the following commands
执行以下命令 -
sudo apt-get install cuda-toolkit -
sudo apt-get install nvidia-gds -
Reboot the system for the changes to take effect
重新启动系统以使更改生效
Basic Commands to Use
要使用的基本命令
Once you have CUDA installed, here are some helpful commands.
一旦你安装了CUDA,这里有一些有用的命令。
lspci | grep VGA
The purpose of this command is to identify and list the GPUs in your system.此命令的目的是识别和列出系统中的GPU。 
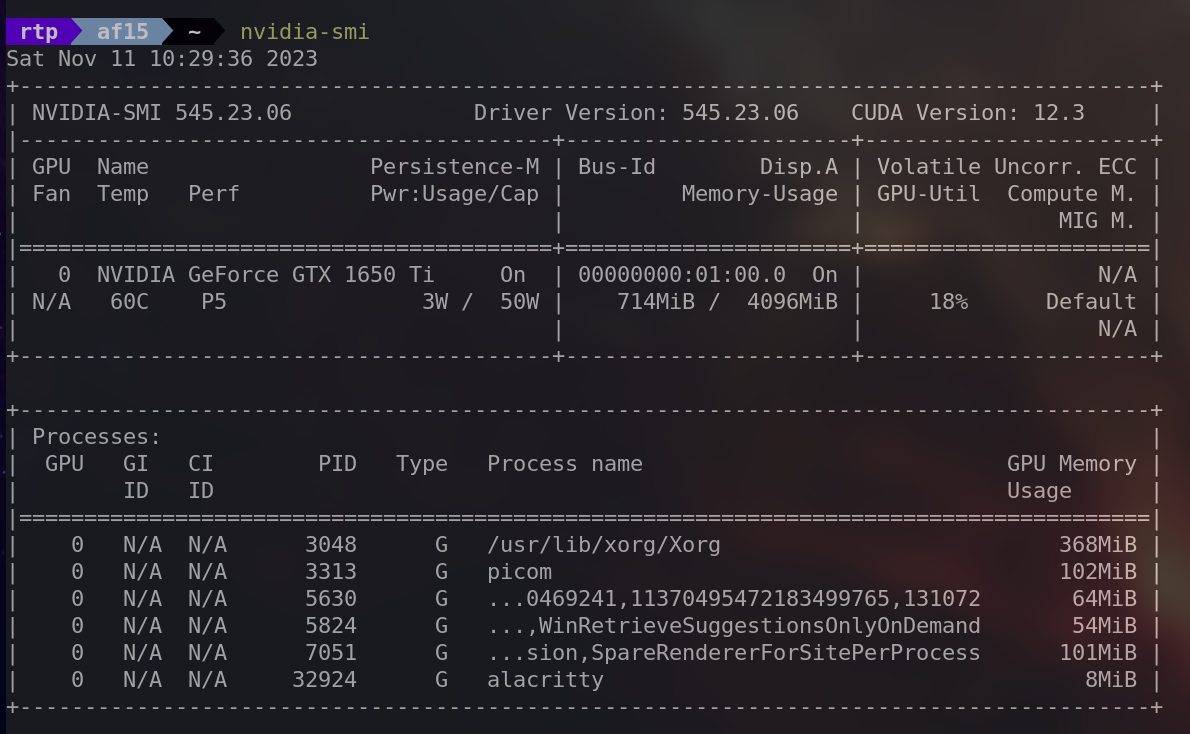
nvidia-smi
It stands for “NVIDIA System Management Interface” It provides detailed information about the NVIDIA GPUs in your system, including utilization, temperature, memory usage and more.
它代表“NVIDIA系统管理接口”它提供有关系统中NVIDIA GPU的详细信息,包括利用率、温度、内存使用等。
sudo lshw -C display
The purpose is to provide detailed information about the display controllers in your system, including graphics cards.目的是提供有关系统中显示控制器(包括图形卡)的详细信息。 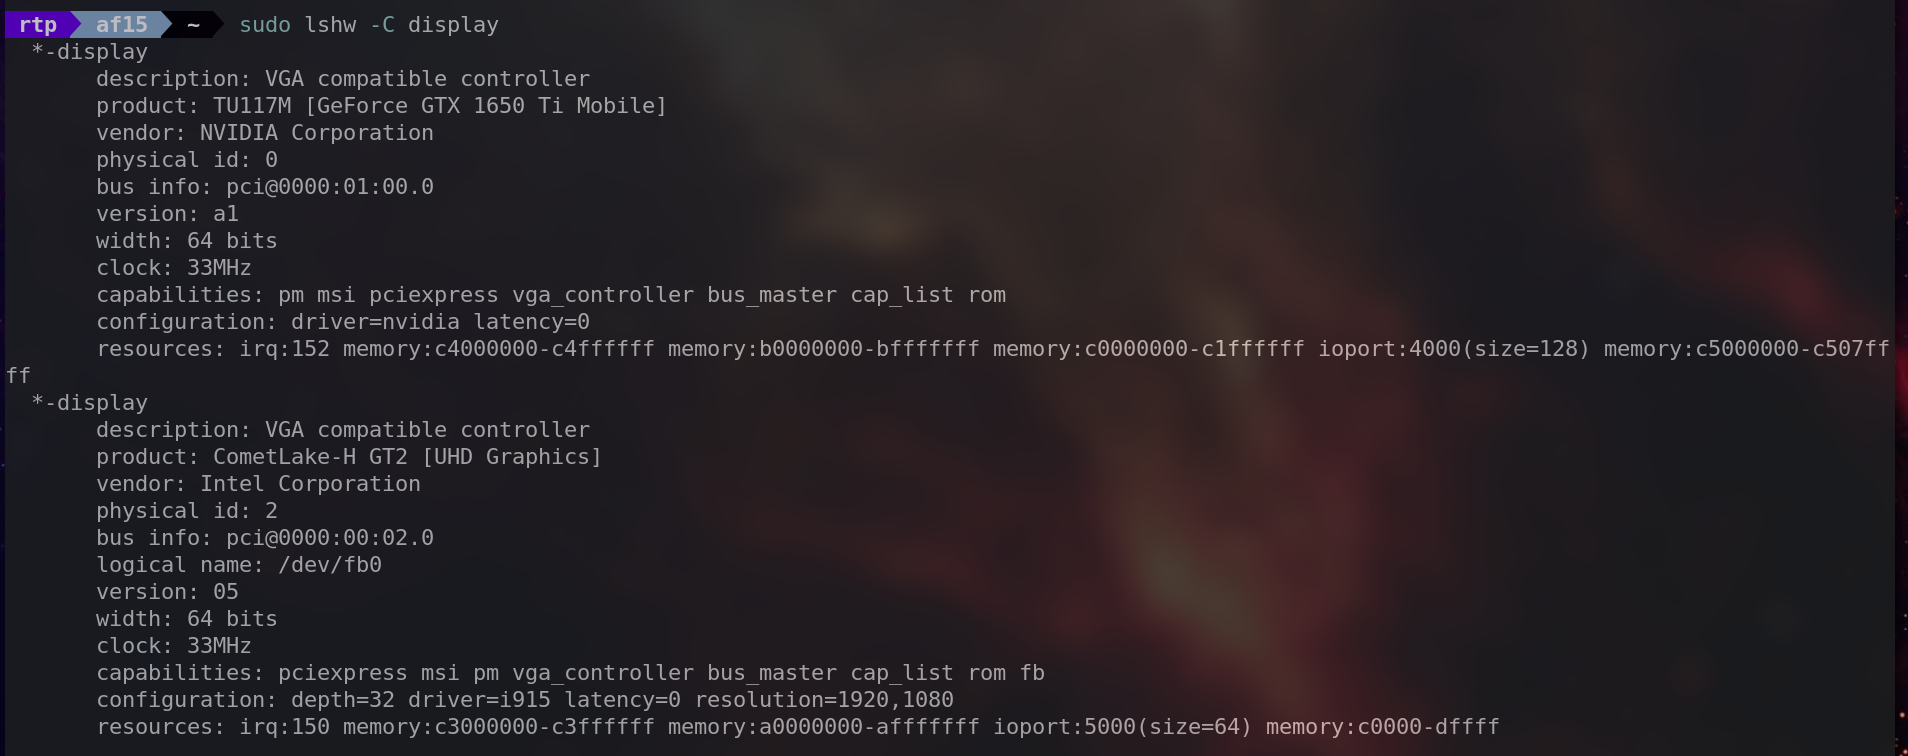
inxi -G
This command provides information about the graphics subsystem, including details about the GPU and the display.此命令提供有关图形子系统的信息,包括有关GPU和显示器的详细信息。 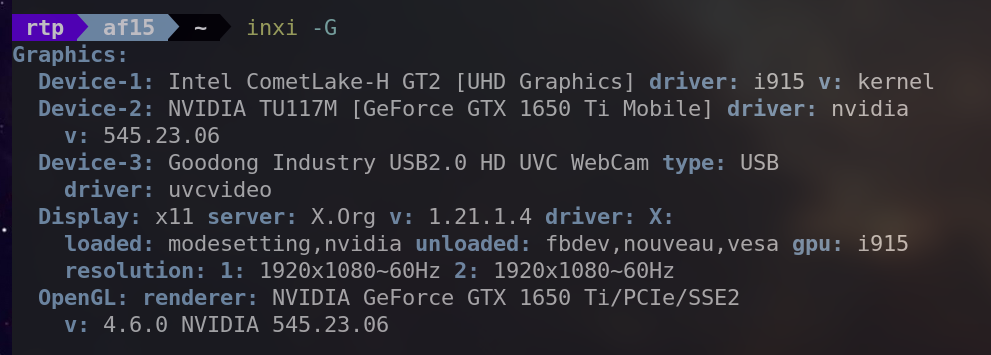
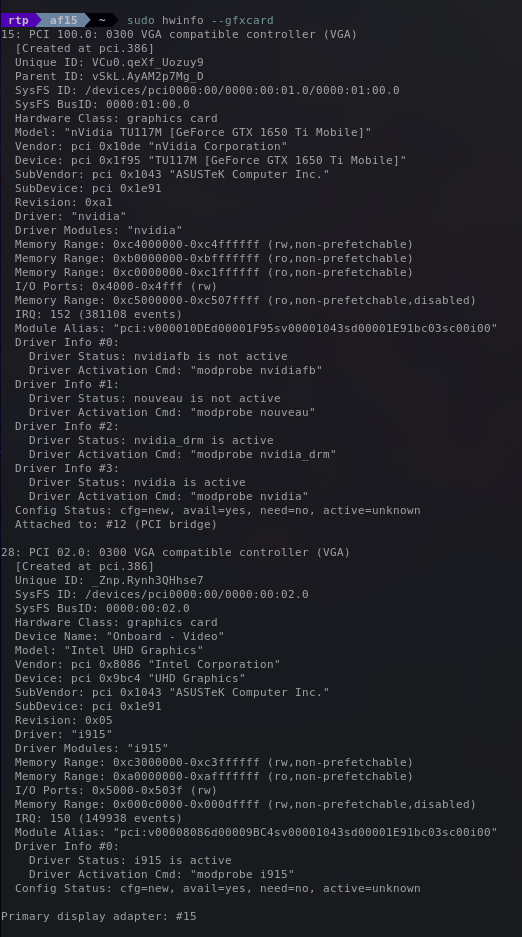
sudo hwinfo --gfxcard
Its purpose is to obtain detailed information about the graphics cards in your system.
其目的是获取有关系统中图形卡的详细信息。
Get Started with the Cuda Framework
Cuda框架入门
As we have installed the CUDA Framework, let’s start executing operations that showcases its functionality.
既然我们已经安装了CUDA框架,让我们开始执行展示其功能的操作。
Array Addition Problem 数组加法问题
A suitable problem to demonstrate the parallelization of GPUs is the Array addition problem.
演示GPU并行化的一个合适的问题是数组加法问题。
Consider the following arrays:
考虑以下数组:
-
Array A = [1,2,3,4,5,6]
数组A = [1,2,3,4,5,6] -
Array B = [7,8,9,10,11,12]
数组B = [7,8,9,10,11,12] -
We need to store the sum of each element and store it in Array C.
我们需要存储每个元素的和,并将其存储在数组C中。 -
Like C = [1+7,2+8,3+9,4+10,5+11,6+12] = [8,10,12,14,16,18]
如C = [1+ 7,2 + 8,3 + 9,4 + 10,5 + 11,6 +12] = [8,10,12,14,16,18] -
If the CPU is to execute such operation, it would be executing the operation like the below code.
如果CPU要执行这样的操作,它将像下面的代码一样执行操作。
|
|
The previous method involves traversing the array elements one by one and performing the additions sequentially. However, when dealing with a substantial volume of numbers, this approach becomes sluggish due to its sequential nature.
前面的方法涉及逐个遍历数组元素并顺序执行加法。然而,当处理大量的数字时,这种方法由于其顺序性而变得缓慢。
To address this limitation, GPUs offer a solution by parallelizing the addition process. Unlike CPUs, which execute operations one after the other, GPUs can concurrently perform multiple additions.
为了解决这个问题,GPU提供了一个并行加法过程的解决方案。与一个接一个地执行操作的CPU不同,GPU可以同时执行多个加法。
For instance, the operations 1+7, 2+8, 3+9, 4+10, 5+11 and 6+12 can be executed simultaneously through parallelization with the assistance of a GPU.
例如,操作1+7、2+8、3+9、4+10、5+11和6+12可以在GPU的辅助下通过并行化同时执行。
Utilizing CUDA, the code to achieve this parallelized addition is as follows:
利用CUDA,实现这种并行加法的代码如下:
We will use a kernel file (.cu) for the demonstration.
我们将使用内核文件(.cu)进行演示。
Let’s go through the code one by one.
让我们一个一个地检查代码。
|
|
-
__global__specifier indicates that this function is a kernel function, which will be called on the GPU.
__global__说明符表示此函数是内核函数,将在GPU上调用。 -
vectorAddtakes three integer pointers (a, b, and c) as arguments, representing vectors to be added.
vectorAdd将三个整数指针(a、B和c)作为参数,表示要相加的向量。 -
threadIdx.xretrieves the index of the current thread (in a one-dimensional grid).
threadIdx.x检索当前线程的索引(在一维网格中)。 -
The sum of the corresponding elements from vectors a and b is stored in vector c.
来自向量a和B的对应元素的和存储在向量c中。
Now lets go through the main function.
现在让我们来看看main函数。
Pointers cudaA, cudaB and cudaC are created to point to memory on the GPU.
创建指针 cudaA 、 cudaB 和 cudaC 以指向GPU上的存储器。
|
|
Using cudaMalloc, memory is allocated on the GPU for the vectors cudaA, cudaB, and cudaC.
使用 cudaMalloc ,在GPU上为向量cudaA、cudaB和cudaC分配内存。
|
|
The content of vectors a and b is copied from the host to the GPU using cudaMemcpy.
使用 cudaMemcpy 将向量a和B的内容从主机复制到GPU。
|
|
The kernel function vectorAdd is launched with one block and a number of threads equal to the size of the vectors.
启动内核函数 vectorAdd 时使用一个块和与向量大小相等的线程数。
|
|
The result vector cudaC is copied from the GPU back to the host.
将结果向量 cudaC 从GPU复制回主机。
|
|
We can then print the results as usual
然后我们可以像往常一样打印结果
|
|
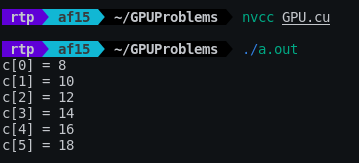
For executing this code, we will use nvcc command.
为了执行此代码,我们将使用 nvcc 命令。
We will get the output as
我们将得到输出为
Here’s the full code for your reference.
下面是完整的代码供您参考。
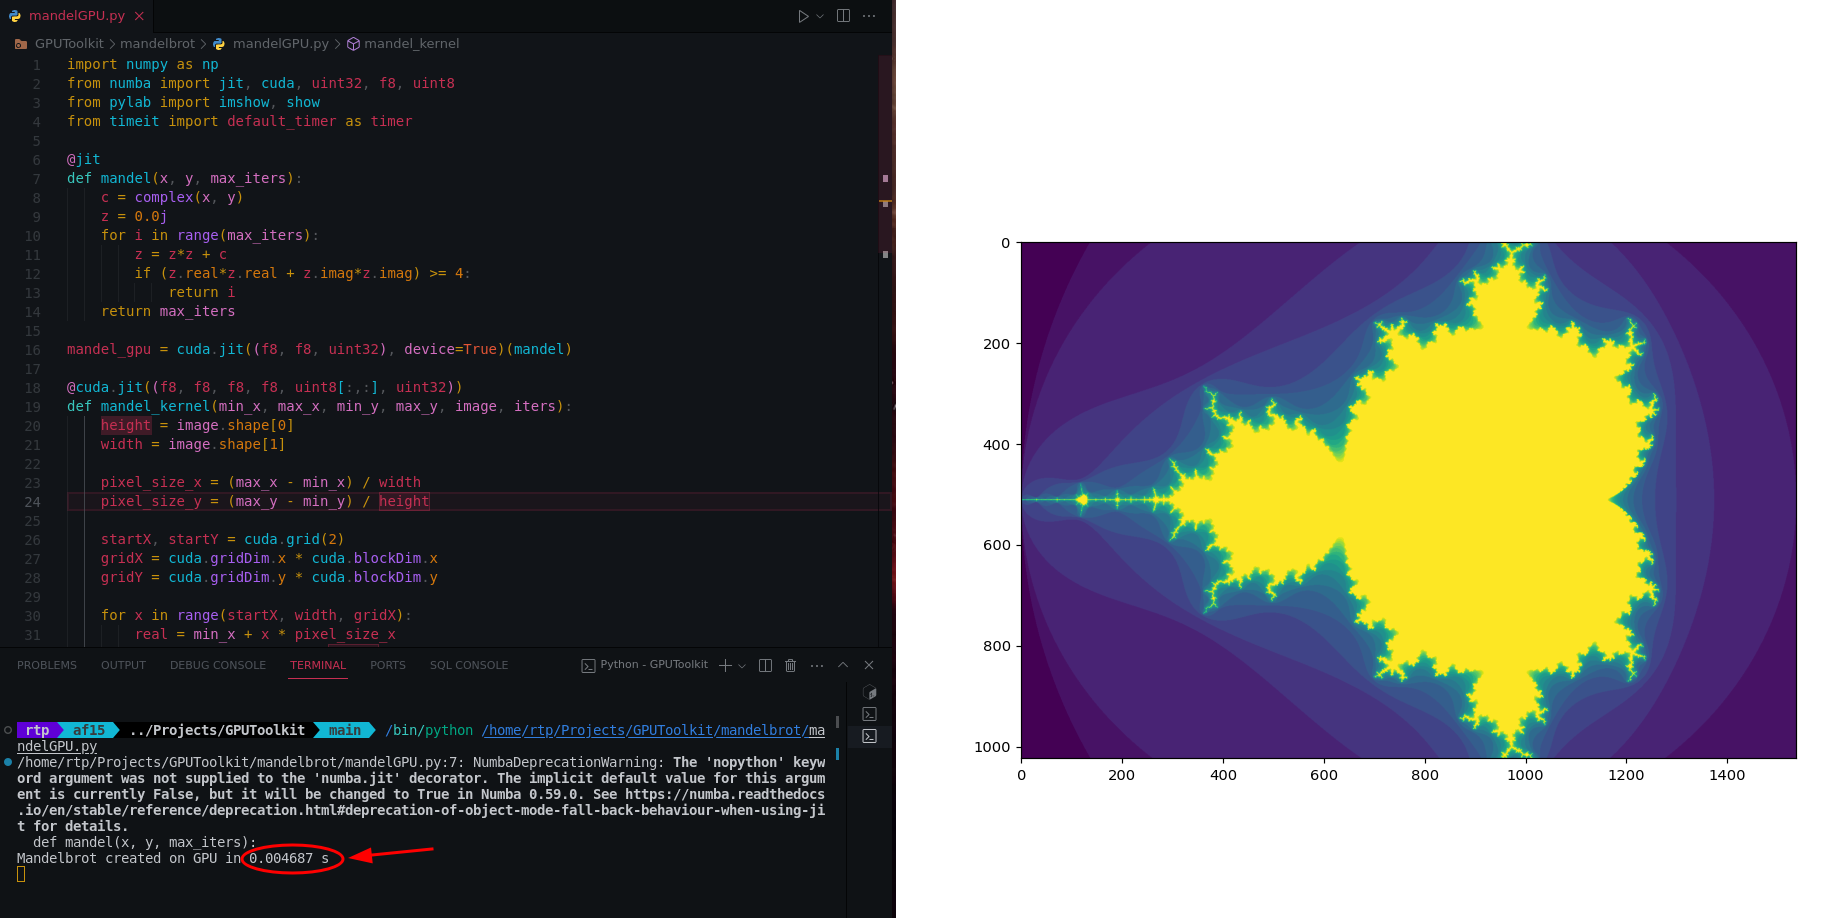
Optimize Image Generation in Python Using the GPU
使用GPU在Python中优化图像生成
-
This section explores the optimization of performance-intensive tasks, such as image generation, using GPU processing.
本节探讨使用GPU处理优化性能密集型任务,例如图像生成。 -
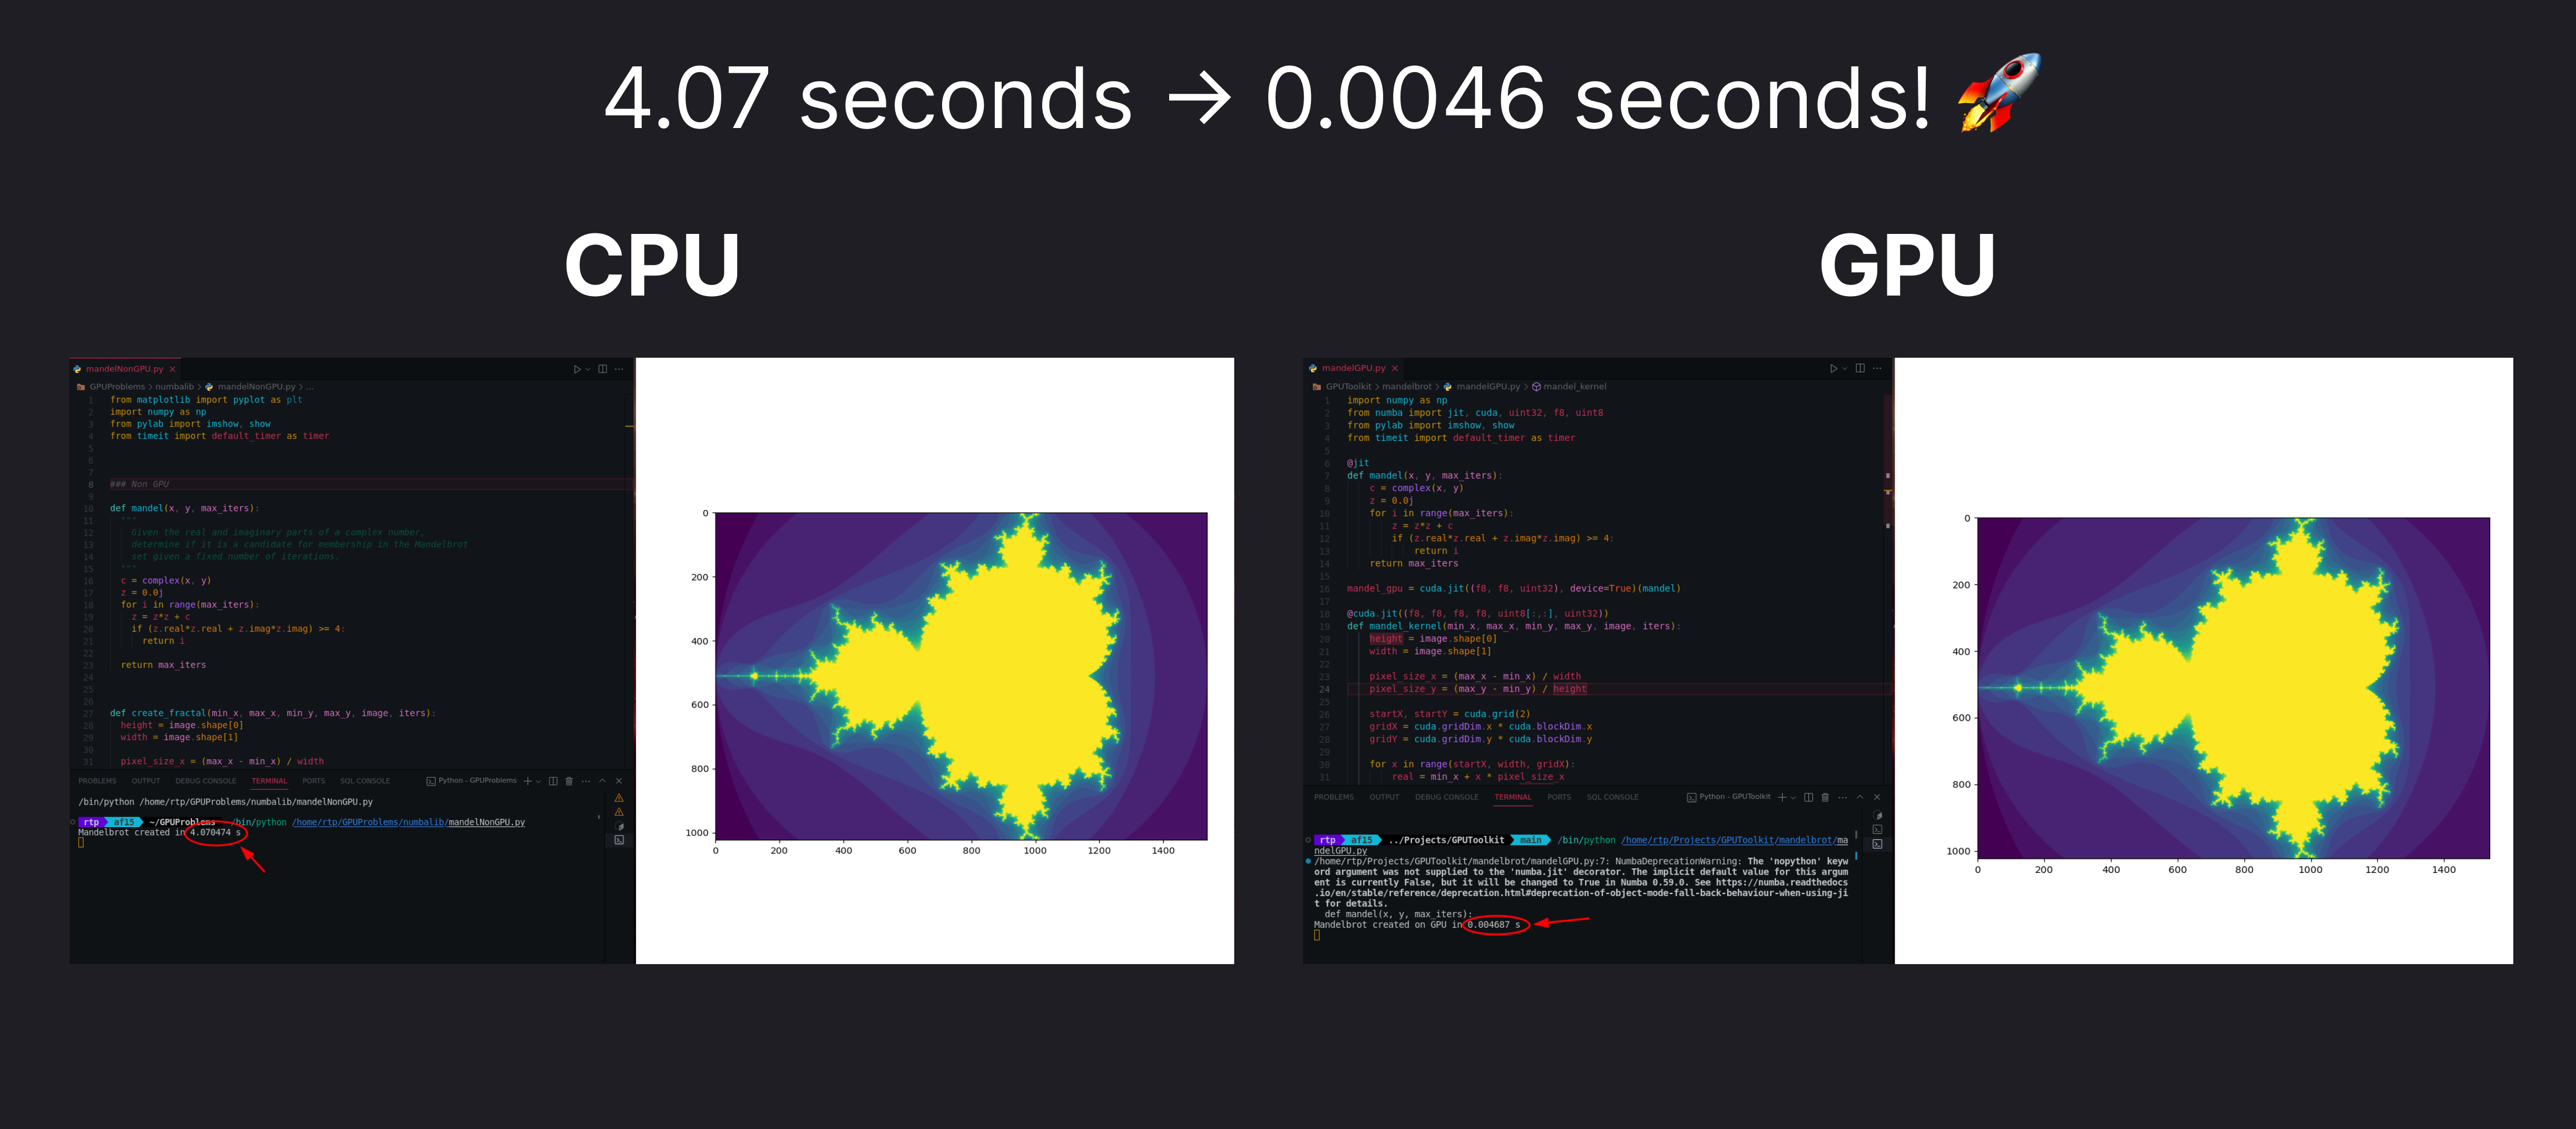
Mandelbrot set is a mathematical construct that forms intricate visual patterns based on the behavior of specific numbers in a prescribed equation. Generating one is a resource intensive operation.
曼德尔布罗特集是一种数学构造,它根据指定等式中特定数字的行为形成复杂的视觉模式。生成一个是资源密集型操作。 -
In the following code snippet, you can observe the conventional method of generating a Mandelbrot set using CPU processing, which is slow.
在下面的代码片段中,您可以观察到使用CPU处理生成Mandelbrot集的传统方法,这种方法很慢。
|
|
The above code produces the output in 4.07 seconds.
上面的代码在 4.07 秒内产生输出。

-
To make this faster, we can parallelize the code with GPU by using Numba library, Lets see how its done.
为了使这更快,我们可以通过使用Numba库将代码与GPU并行化,让我们看看它是如何完成的。 -
We will import Just-In-Time compilation, CUDA for GPU acceleration, and other utilities from numba
我们将从numba导入即时编译、CUDA GPU加速和其他实用程序
|
|
- The
@jitdecorator signals Numba to perform Just-In-Time compilation, translating the Python code into machine code for improved execution speed.
@jitdecorator向Numba发出信号,执行即时编译,将Python代码转换为机器码,以提高执行速度。
|
|
mandel_gpuis a GPU-compatible version of the mandel function created using cuda.jit. This allows the mandel logic to be offloaded to the GPU.
mandel_gpu是使用cuda.jit创建的mandel函数的GPU兼容版本。这允许将mandel逻辑卸载到GPU。- This is done by using
@cuda.jitdecorator along with specifying the data types (f8 for float, uint32 for unsigned integer) for the function arguments.
这是通过使用@cuda.jit装饰器沿着指定函数参数的数据类型(f8表示浮点数,uint32表示无符号整数)来完成的。 - The
device=Trueargument indicates that this function will run on the GPU.
device=True参数表示此函数将在GPU上运行。
|
|
- The mandel_kernel function is defined to be executed on the CUDA GPU. It is responsible for parallelizing the Mandelbrot set generation across GPU threads.
mandel_kernel函数被定义为在CUDA GPU上执行。它负责跨GPU线程并行化Mandelbrot集生成。
|
|
- Now, we can use the GPU-accelerated Mandelbrot set generation in the create_fractal_gpu function. This function allocates GPU memory, launches the GPU kernel (mandel_kernel), and copies the result back to the CPU.
现在,我们可以在create_fractal_gpu函数中使用GPU加速的Mandelbrot集生成。此函数分配GPU内存,启动GPU内核(mandel_kernel),并将结果复制回CPU。
|
|
The above code gets executed in 0.0046 seconds. Which is a lot faster the CPU Based code we had earlier.
上面的代码在 0.0046 seconds 中执行。这比我们之前使用的基于CPU的代码快得多。
Here’s the full code for your reference.
下面是完整的代码供您参考。
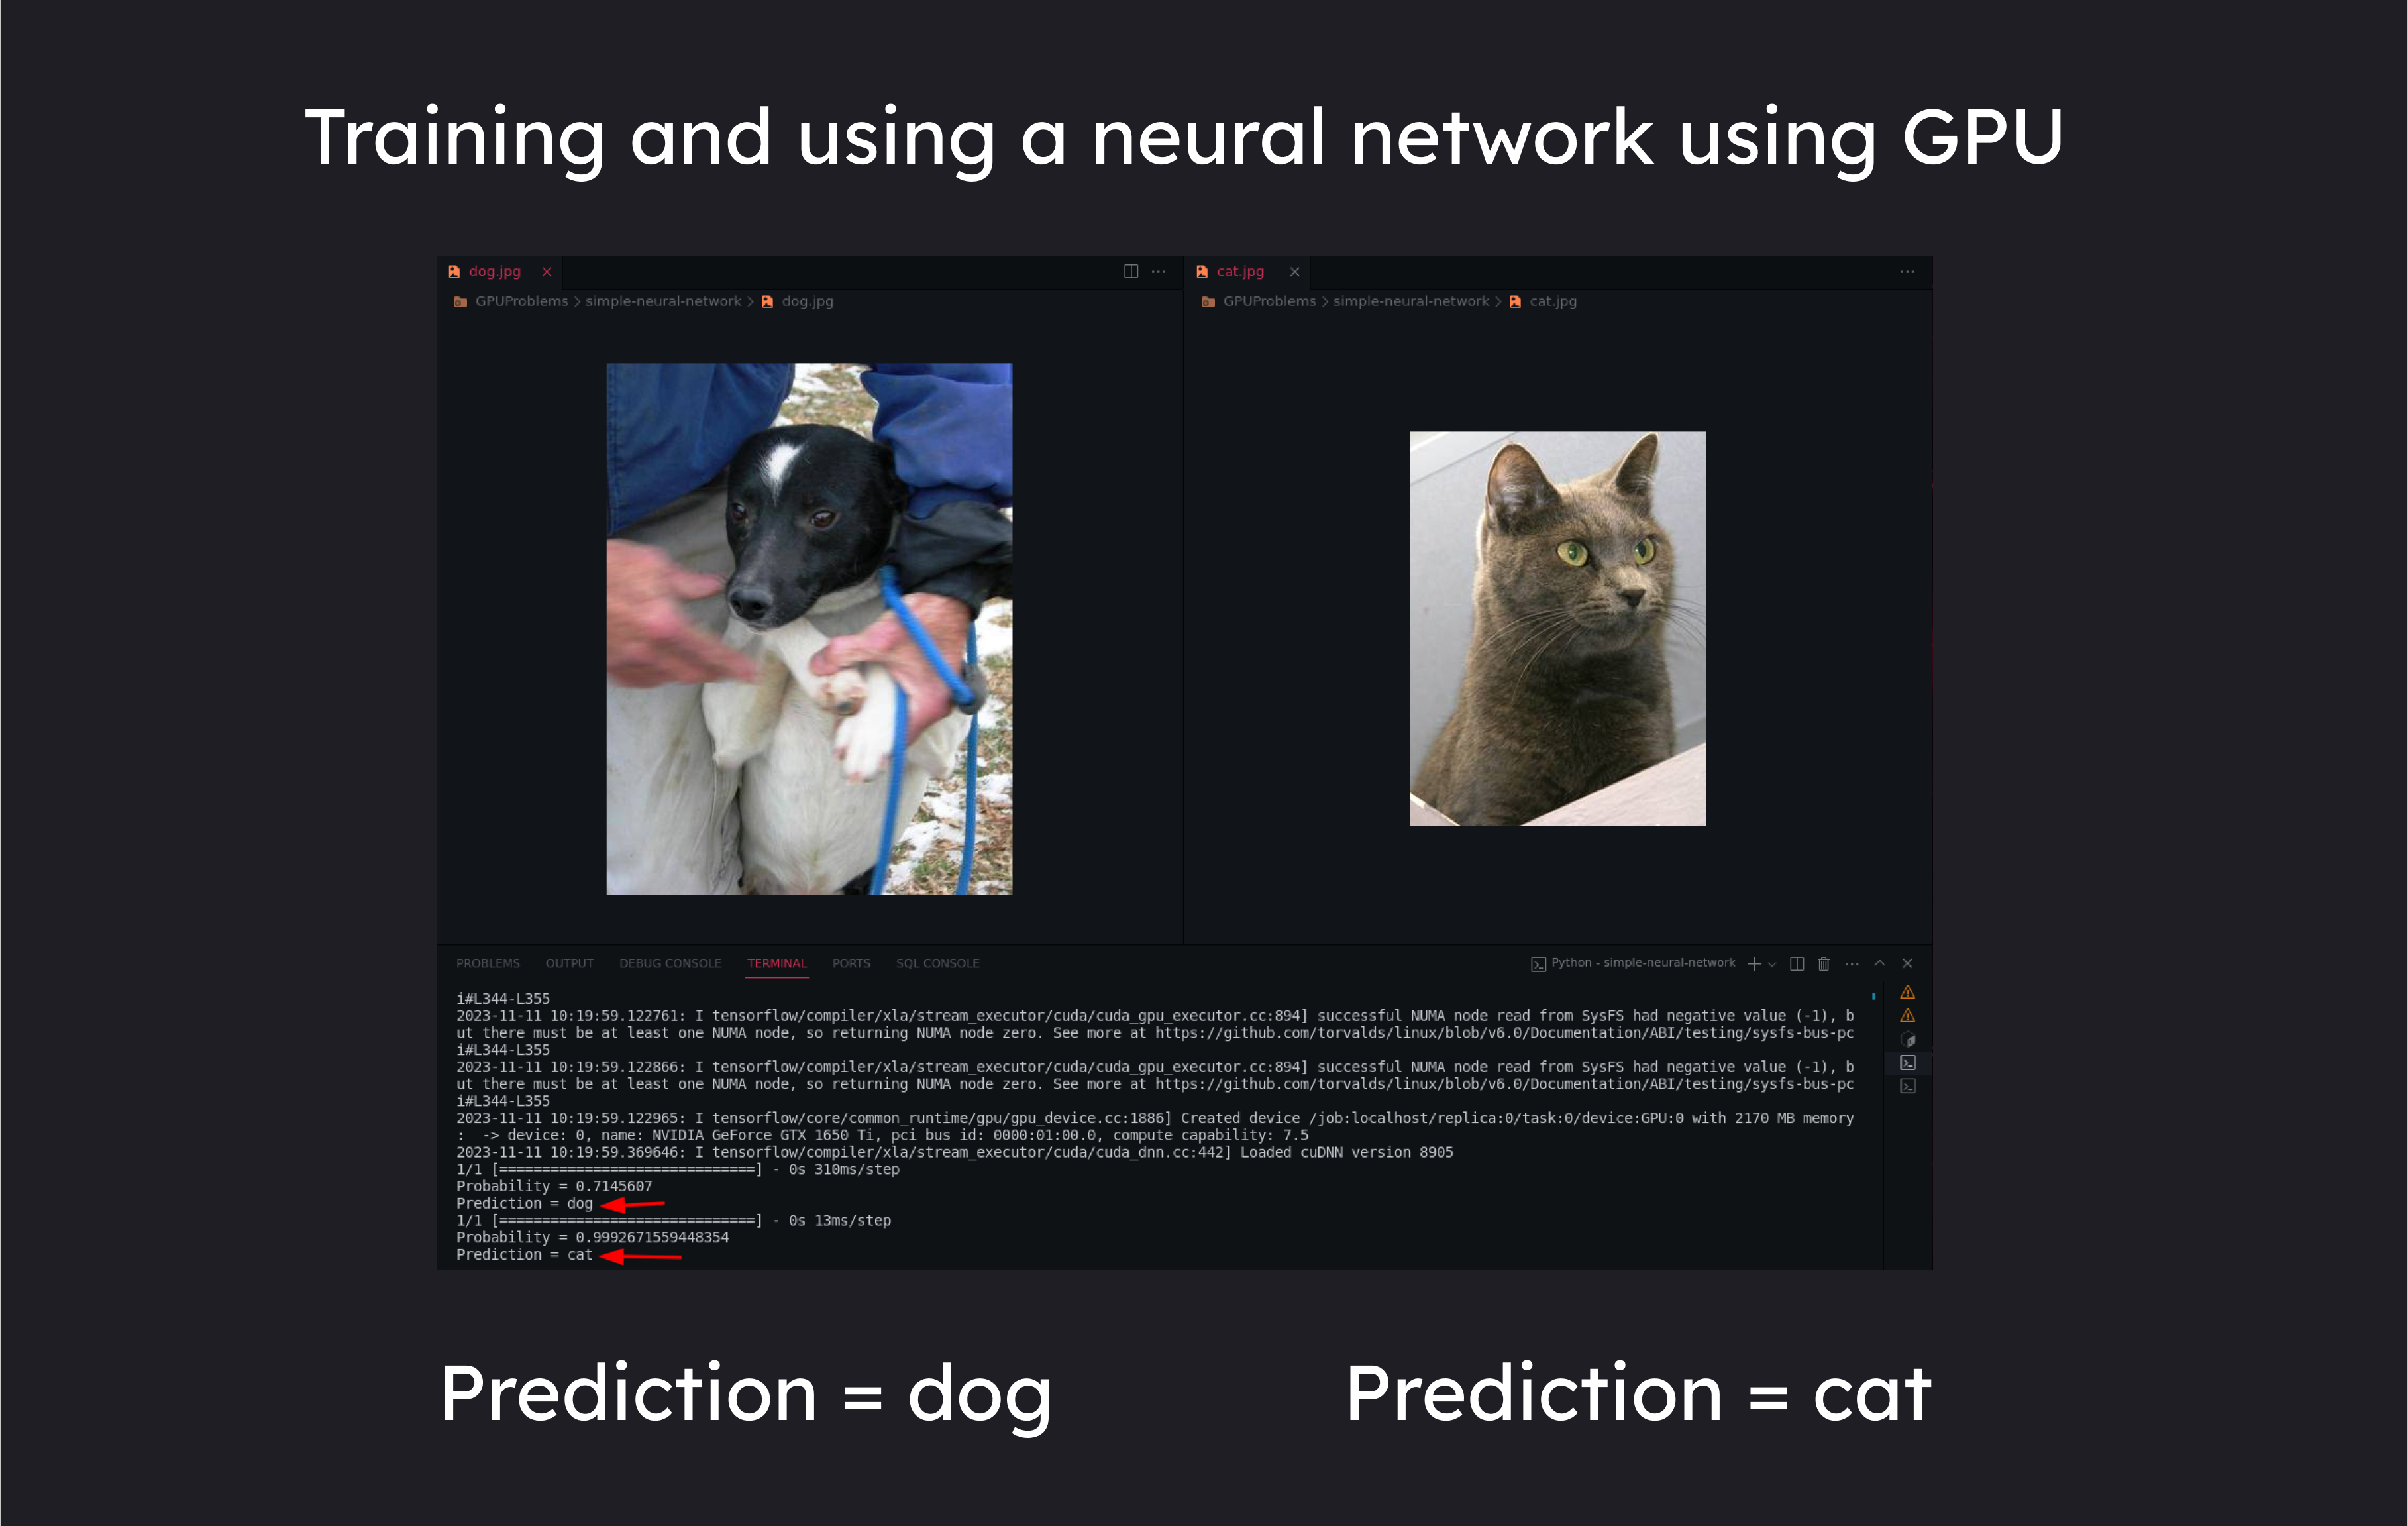
Training a Cat VS Dog Neural Network Using the GPU
使用GPU训练猫与狗神经网络
One of the hot topics we see nowadays is how GPUs are getting used in AI, So to demonstrate that we will be creating a neural network to differentiate between cats and dogs.
我们现在看到的热门话题之一是GPU如何在AI中使用,所以为了证明我们将创建一个神经网络来区分猫和狗。
Prerequisites 先决条件
-
CUDA
-
Tensorflow -> Can be installed via
pip install tensorflow[and-cuda]
Tensorflow ->可以通过pip install tensorflow[and-cuda]安装 -
We will use a data set of cats and dogs from kaggle
我们将使用来自Kaggle的猫和狗的数据集 -
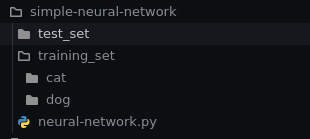
Once you have downloaded it, Unzip them, organize the pictures of cats and dogs in the training folder into different subfolders, Like so.
一旦你下载了它,解压缩它们,组织训练文件夹中的猫和狗的图片到不同的文件夹,像这样.
This is the code we will use for training and using the Cat vs Dog Model.
这是我们将用于训练和使用猫对狗模型的代码。
The below code uses a convolutional neural network, you can read more details about it
下面的代码使用了卷积神经网络,你可以阅读更多关于它的细节
Importing Libraries 图书馆
- pandas and numpy for data manipulation.
pandas和numpy用于数据操作。 - Sequential for creating a linear stack of layers in the neural network.
用于在神经网络中创建线性层堆栈的顺序。 - Convolution2D, MaxPooling2D, Dense, and Flatten are layers used in building the Convolutional Neural Network (CNN).
卷积2D,MaxPooling2D,Dense和Flatten是用于构建卷积神经网络(CNN)的层。 - ImageDataGenerator for real-time data augmentation during training.
ImageDataGenerator用于在训练过程中进行实时数据增强。
|
|
Initializing the Convolutional Neural Network
初始化卷积神经网络
|
|
Loading the data for training
加载用于训练的数据
|
|
Building the CNN Architecture
构建CNN架构
|
|
Compiling the model 编译模型
|
|
Training the model 训练模型
|
|
Once we have trained the model, The model is stored in a .h5 file using classifier.save
一旦我们训练了模型,模型将使用 classifier.save 存储在.h5文件中。
In the below code, we will use this trained_model.h5 file to recognize cats and dogs.
在下面的代码中,我们将使用这个 trained_model.h5 文件来识别猫和狗。
|
|
Let’s see the output让我们看看输出 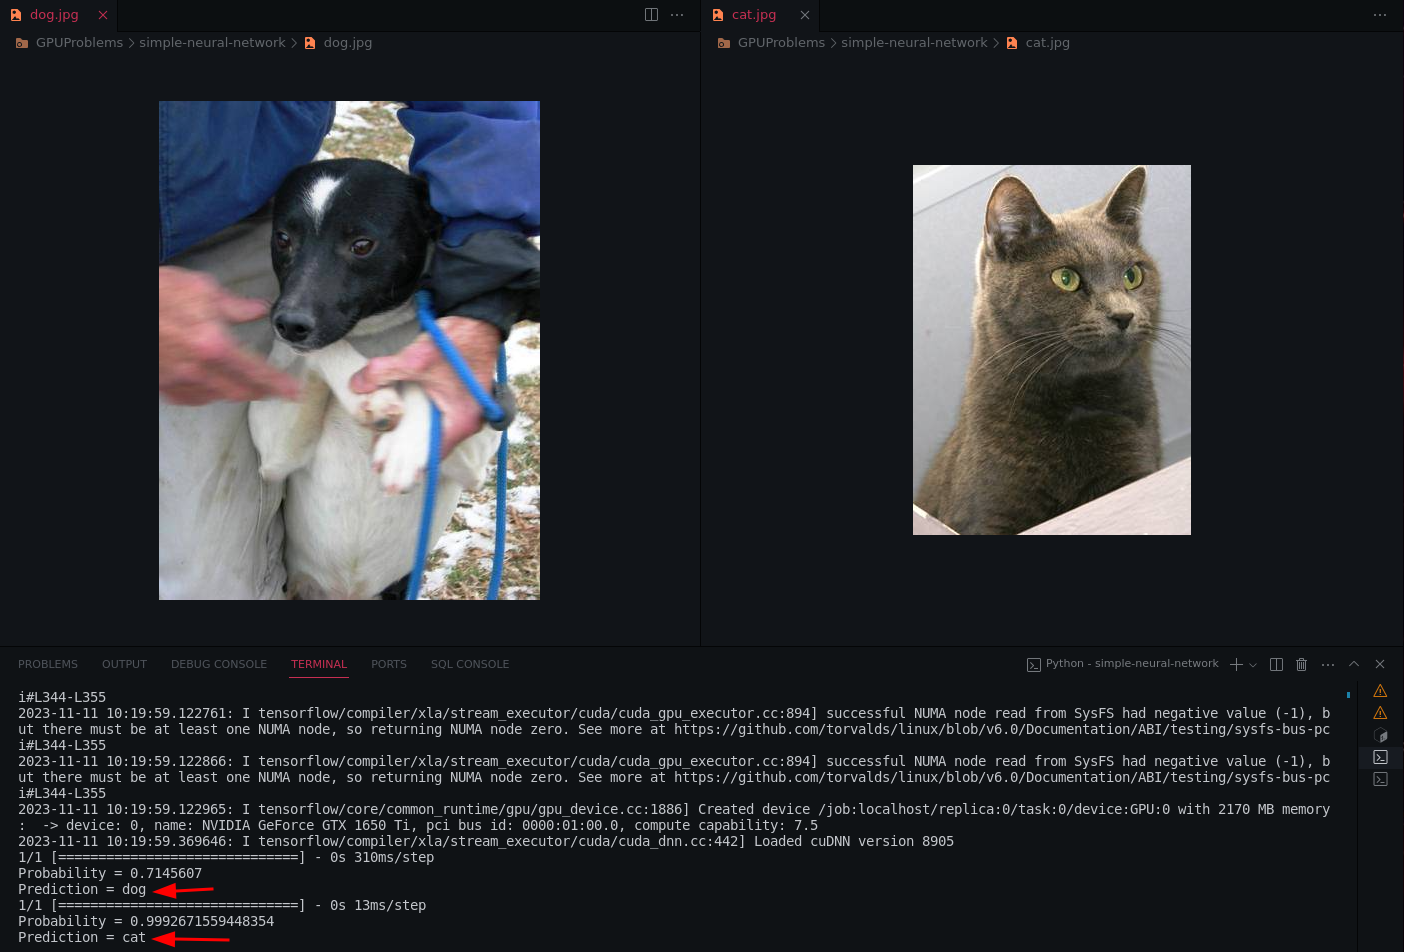
Here’s the full code for your reference
下面是完整的代码供您参考
Conclusion 结论
In the upcoming AI age, GPUs are not a thing to be ignored, We should be more aware of its capabilities.
在即将到来的AI时代,GPU是一个不容忽视的东西,我们应该更加了解它的能力。
As we transition from traditional sequential algorithms to increasingly prevalent parallelized algorithms, GPUs emerge as indispensable tools that empower the acceleration of complex computations. The parallel processing prowess of GPUs is particularly advantageous in handling the massive datasets and intricate neural network architectures inherent to artificial intelligence and machine learning tasks.
随着我们从传统的顺序算法过渡到越来越流行的并行算法,GPU成为加速复杂计算的不可或缺的工具。GPU的并行处理能力在处理人工智能和机器学习任务所固有的大规模数据集和复杂的神经网络架构方面特别有利。
Furthermore, the role of GPUs extends beyond traditional machine learning domains, finding applications in scientific research, simulations, and data-intensive tasks. The parallel processing capabilities of GPUs have proven instrumental in addressing challenges across diverse fields, ranging from drug discovery and climate modelling to financial simulations.
此外,GPU的作用超出了传统的机器学习领域,在科学研究、模拟和数据密集型任务中找到了应用。GPU的并行处理能力已被证明有助于解决从药物发现和气候建模到金融模拟等不同领域的挑战。
Reference 参考
- Using Numba for mandelbrot generation
使用Numba生成mandelbrot - Using Convolutional Neural Networks
使用卷积神经网络